First Aid Wall
First Aid Wall is very useful for learning the basic skills of aid climbing – which is also possibly the fastest way to improve your trad climbing game. The most recent addition to the Glen Lake Crag, these short aid climbs offer new aid climbers a place to practice using aiders, hooks, and other clean aid gear under the protection of a quick-access top rope.
Clean aid only please (no hammers) on this practice wall, thanks for understanding! Hammering in pitons over and over cause sever-growing piton scars, so please help keep this wall to clean gear only – the wall will last many years longer! For use of nail-up gear (pitons/pins, etc), find your way up to the Ochre Wall and hammer up a storm!
Quick Facts
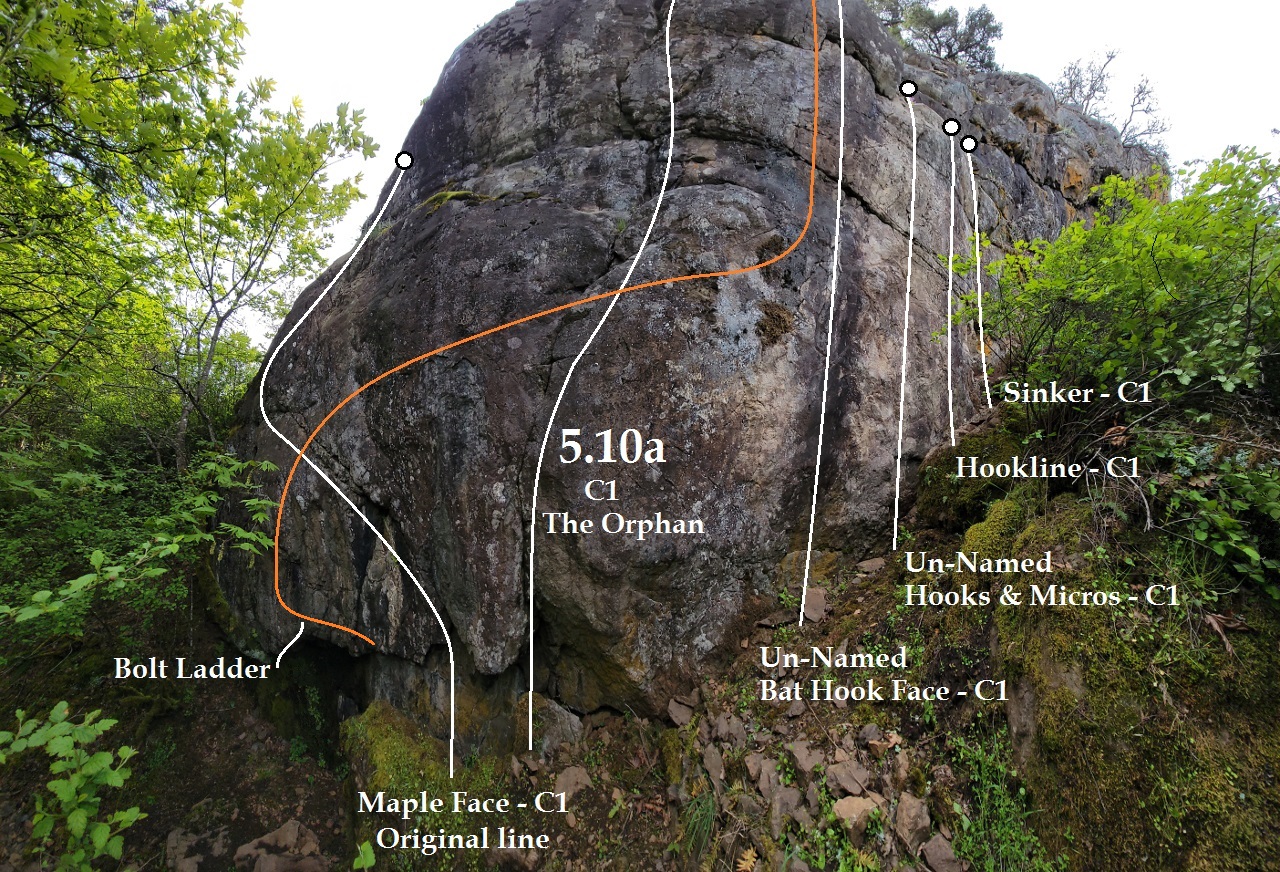
Maple Face
This ‘line’ is more of a ‘choose-your-own-adventure’ face than a classic route. More valuable here is the multitude of opportunities for gear placement, with wide latitude for your particular ascent. However, to climb the historical first ascent, start under the overhang, below the white stained broken ‘tooth’, approximately two meters right of the ‘face maple tree’.
Follow the upper of two 45-degree left trending cracks up to the sloping ledge with jugs at the back, then follow discontinuous cracks and finally lower angle face to the top. Keep off the ramp to the left. Both the 45-degree cracks offer different placement options, many great horizontal nut placements in ‘pods’, and several clean beak placements (used as hooks – i.e. not hammered in). There is a bathook sequence off the ground on the left side of the face Maple tree.
Please be mindful of young Maple trees in the cracks. Climbing can be done without disturbing them, and we’d like to see these seedlings have a chance like the big tree growing out of this face at the bottom that gives this wall its character.
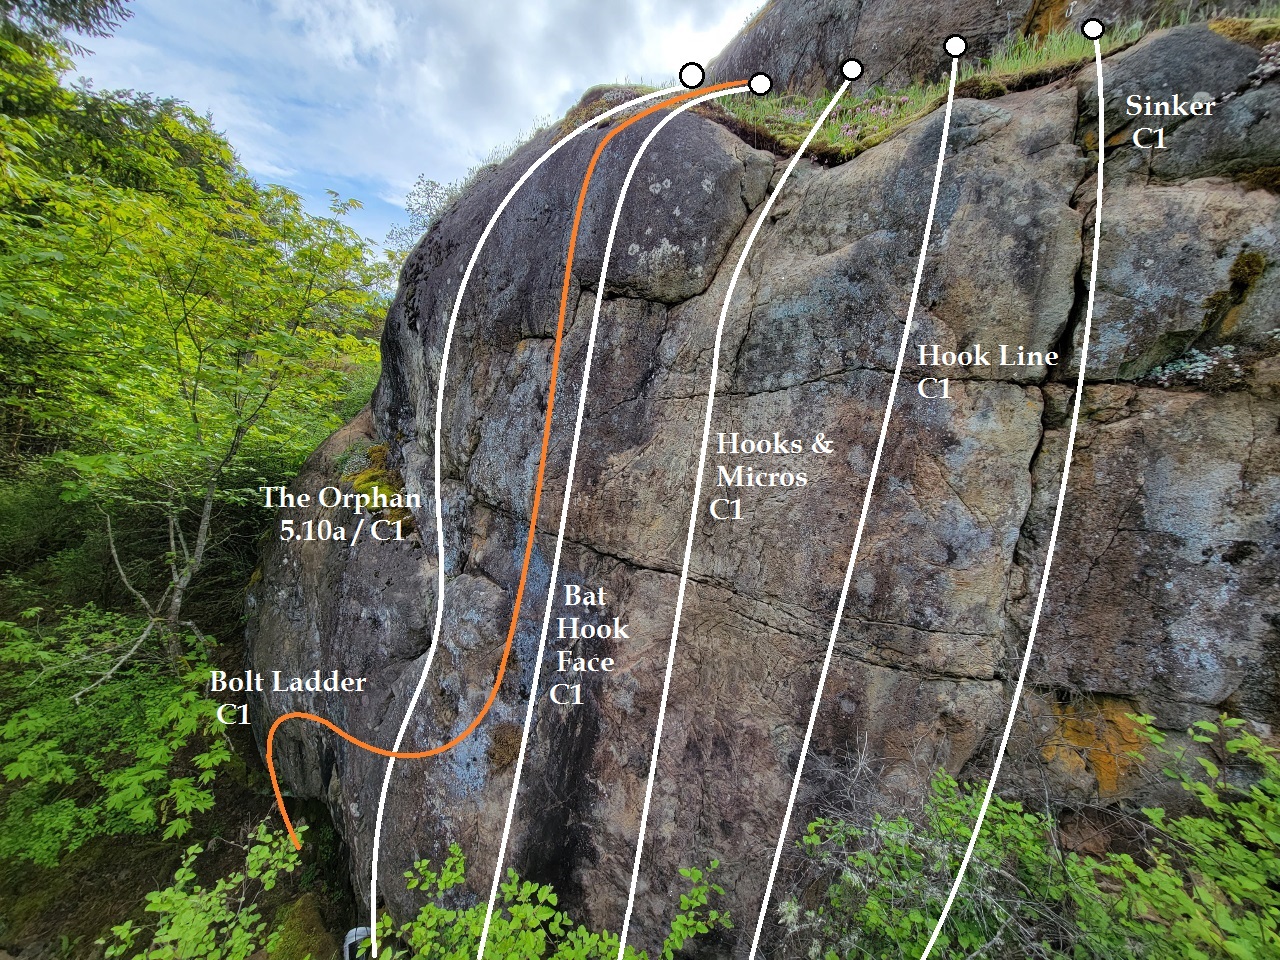
Un-Named Bolt ladder
Etrier movement practice! Follow the bolt line starting far left beside the Maple Tree trunk, arcing through the overhang, and then linking to a vertical bolt line immediately right of The Orphan, leading up to anchors. Practice moving first bolt to bolt, then try skipping bolts, moving forward and backward (feet first and headfirst) to gain proficiency in your etts! (familiarity with etriers/aiders is a critical base skill).
The Orphan
Follow the short well-defined crack. It has a stiff start, is slightly overhanging, and has a tricky flaring crack to finish. Top rope anchors set 2 meters back from the top of the climb against back wall of ledge. 'The Orphan' was recently bolted as a sport climb, created from an old aid climbing line, originally lead on aid by Marko Sand Cory Brooks early 2000's. It gained its name when it was the only line of the wall, with no other sport or aid climbs around it of any type.
Un-Named Hooks & Micros
Steep hard aid training line, mostly of bat hooks, with a couple of RURP / micro-nut placements. 1 meter of right facing corner at the end for pins / peckers / bird beaks. Great line to practice hook moves on top rope, but not recommended to be lead due to ground fall potential. Anchors are 3 meters above climb against back wall.
Hook Line
Another short hook training line, close enough to the bat hook face to afford a trainer and student to climb simultaneously, side by side, and allowing for better training by example. This line would go C2+ or C3 if lead (not suggested), given the immediate proximity to the ground.
Sinker
A varied and interesting crack, flaring in places, narrow in others, affording a wide range of gear placement options. Opportunities to use almost every piece on the rack, including a section in the top third where cam hooks may be used effectively. A good basic practice line. Anchor widely spaced across arching flange / dihedral of rock. FA Marko, '22.
Additional Notes
This First Aid Wall is intended as an aid climbing practice wall, but of course experienced aid climbers can lead all of these lines as well. As mentioned, grades of these practice aid routes sit at C1 due to the top rope, but because of the thin hook moves off the deck, some lines could carry aid lead ratings in the C2 - C3 range. Easy access top ropes offer advanced aid skill building opportunities (especially hooking), without the necessity of being on lead. Fall as many times as you need to and master your basic aid skills.
Practicing aid climbing is one of the fastest tracks to advanced gear placement skills, rigging abilities, and general rock competency making any climber stronger, safer, and more competent in any environment. As aid skills improve, increased confidence and competence naturally leads to longer challenges.
At Glen Lake Crag, it's natural to migrate to the Ochre Wall above and begin to hammer pitons (a.k.a. ‘pins’) of all varieties. Again, please no hammers / pitons on the First Aid Wall; please keep it clean for the beginners. At the time of this publishing, many of the routes were still under construction although all anchors are in already in place. Updates will be added as the features are completed.